Unlocking the Video Potential of the Canon EOS R50: A Comprehensive Guide
The Canon EOS R50 is a compact and powerful mirrorless camera that punches well above its weight, especially when it comes to video capabilities. Whether you’re a budding vlogger, content creator, or simply want to capture high-quality videos of your life’s moments, the R50 is a fantastic tool to have in your hands. This comprehensive guide will walk you through everything you need to know to start shooting impressive videos with your Canon EOS R50, from basic settings to more advanced techniques.
1. Getting Started: Setting Up Your EOS R50 for Video

Before you dive into recording, it’s essential to ensure your camera is properly set up for video capture. Here’s a checklist to get you started:
- Battery and Memory Card: Make sure your battery is fully charged. Video recording is power-intensive, and you don’t want to run out of juice mid-shoot. Insert a fast SD card with sufficient storage capacity. For video, especially 4K, a UHS-I or UHS-II card with a Video Speed Class rating of V30 or higher is recommended.
- Mode Dial: Turn the mode dial to the “Movie” mode. This will optimize the camera’s settings and display for video recording. You can also use “Hybrid Auto” or “Movie for Close-up Demos” for specific scenarios, but “Movie” mode gives you the most control.
- Initial Settings:
- Format Card: It’s always good practice to format your SD card in the camera before shooting, especially if it’s been used in other devices. Navigate to the menu (usually the wrench icon) and find the “Format” option.
- Date/Time and Time Zone: Set the correct date, time, and time zone in the camera’s menu. This is important for organizing your footage and ensuring accurate timestamps.
- Language: Set your preferred language for the camera menu.
2. Understanding Basic Video Settings
The EOS R50 offers a range of video settings to suit different needs and creative visions. Let’s explore the key settings you’ll need to understand:

- Movie Recording Size (Resolution and Frame Rate): This is arguably the most crucial video setting. Navigate to the Movie Rec. Size menu option (usually under the red movie camera icon).
- Resolution: The R50 can record in up to 4K UHD resolution (3840 x 2160 pixels), which provides incredibly sharp and detailed video. You can also choose Full HD (1920 x 1080 pixels) for smaller file sizes and potentially better performance in low light or when using digital image stabilization. 4K is generally recommended for future-proofing and greater flexibility in post-production, but 1080p is still excellent for most online content.
- Frame Rate: Frame rate is measured in frames per second (fps) and determines the smoothness of motion in your video.
- 24fps: Cinematic look, often used for movies and narrative films.
- 30fps: Standard frame rate for television and online video, a good all-around choice.
- 60fps: Smoother motion, ideal for action scenes, slow motion (when slowed down in editing), and fast-paced content.
- 120fps (High Frame Rate): For slow-motion recording in Full HD. This captures slow-motion footage directly in-camera.
- Choosing Resolution and Frame Rate: Consider your intended use. For cinematic projects or detailed shots, 4K at 24fps or 30fps is great. For general vlogging or online content, 1080p at 30fps or 60fps can be excellent. For slow motion, use 120fps in Full HD.
- Movie Recording Quality (Codec and Bitrate): This setting affects the compression and file size of your video. Higher quality settings result in larger files but retain more detail and are better for editing and color grading.
- IPB (Inter-frame): More compressed, smaller file sizes, good for general use and longer recording times.
- ALL-I (Intra-frame): Less compressed, larger file sizes, better for editing and color grading as each frame is individually stored, but limits recording time.
- For most users, IPB (Standard) is sufficient. ALL-I (Light) or IPB (Light) can further reduce file size if needed, but may compromise quality slightly.
- Sound Recording: The R50 has a built-in stereo microphone, which is decent for basic audio. However, for better sound quality, especially in noisy environments or for professional-sounding audio, consider using an external microphone.
- External Microphone Input: The R50 has a 3.5mm microphone input jack. You can connect external microphones like shotgun microphones (for directional sound) or lavalier microphones (for close-up voice recording).
- Manual Audio Levels: In the menu, you can set audio recording to “Manual” and adjust the recording level to prevent clipping (distortion) or overly quiet audio. Use headphones to monitor your audio levels while recording.
- Wind Filter and Attenuator: The R50 has built-in wind filter and attenuator options in the menu to reduce wind noise and handle loud sounds, respectively.
3. Mastering Autofocus for Video
Related articles 01:
1. https://cacutproapk.com/capcut-crafting-stunning-travel-videos-with-ease
3. https://cacutproapk.com/capcut-old-version-apk-why-some-users-prefer-the-older-version
5. https://cacutproapk.com/capcut-vs-picsart-which-app-reigns-supreme-for-editing-in-2024

Autofocus is critical for video, especially if you’re moving or your subject is moving. The EOS R50’s Dual Pixel CMOS AF system is excellent for video.
- AF Mode: In the Quick Control menu (press the Q button), you can select your AF mode. For video, “Movie Servo AF” is the continuous autofocus mode.
- Movie Servo AF: The camera will continuously adjust focus as your subject moves or you change your framing.
- Manual Focus (MF): You can switch to manual focus if you prefer to control focus precisely yourself, or for specific creative effects.
- AF Area: Choose your autofocus area mode to tell the camera where to focus.
- Face+Tracking AF: The camera will automatically detect and track faces and eyes, excellent for vlogging, interviews, and people-centric videos. This is often the best mode for beginners.
- Spot AF, 1-Point AF, Zone AF: These modes allow you to manually select a smaller or larger area to focus on, giving you more control for specific subjects or compositions.
- Touch AF: In Face+Tracking AF or Zone AF, you can tap on the touchscreen to quickly change the focus point to a different subject or area.
- AF Speed and AF Tracking Sensitivity: These settings (found in the AF menu) allow you to fine-tune how quickly the autofocus reacts and how “sticky” it is in tracking subjects. Experiment with these to find settings that suit your shooting style.
4. Exposure Control for Video: Aperture, Shutter Speed, and ISO

Understanding exposure is crucial for well-lit and visually appealing videos. In video, you primarily control exposure using aperture, shutter speed, and ISO.
- Aperture (f-number): Controls the depth of field (how much of your image is in focus).
- Wide aperture (e.g., f/1.8, f/2.8): Shallow depth of field, blurred backgrounds, good for portraits and isolating subjects.
- Narrow aperture (e.g., f/8, f/11): Deep depth of field, everything in focus, good for landscapes or scenes where you want everything sharp.
- Shutter Speed: Controls how long the camera’s sensor is exposed to light, and affects motion blur.
- 180-degree Shutter Rule: A common guideline for video is to set your shutter speed to roughly double your frame rate. For 30fps video, aim for a shutter speed of around 1/60th of a second. For 24fps, aim for 1/50th of a second (or 1/48th if available, otherwise 1/50th is fine). This helps achieve natural-looking motion blur.
- Faster Shutter Speeds: Reduce motion blur but can make video look slightly stroboscopic or unnatural. Use faster shutter speeds in bright light or for specific creative effects.
- ISO: Controls the sensor’s sensitivity to light. Lower ISO values (e.g., ISO 100, 200) produce cleaner images with less noise. Higher ISO values (e.g., ISO 1600, 3200 and above) are needed in low light but introduce more noise (grain).
- Keep ISO as low as possible for the cleanest video quality. Raise ISO only when necessary to achieve proper exposure in low-light conditions.
- Neutral Density (ND) Filters: In very bright sunlight, even at the lowest ISO and narrowest aperture, you might not be able to achieve the desired shutter speed (e.g., 1/60th for 30fps) without overexposing your video. ND filters are like sunglasses for your lens, reducing the amount of light entering the camera, allowing you to use wider apertures or slower shutter speeds in bright light.
5. Image Stabilization (IS)
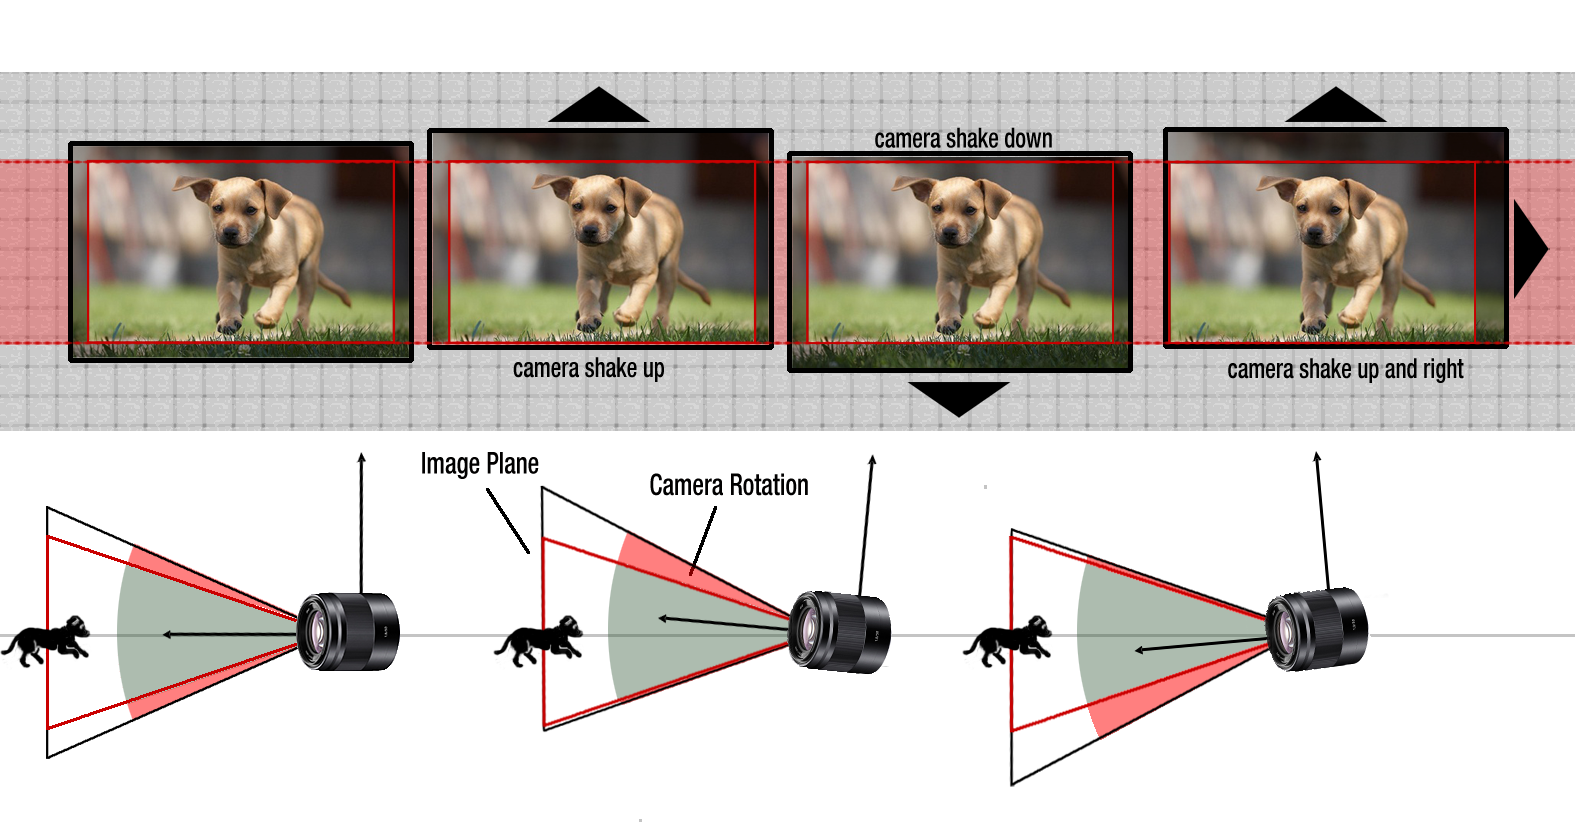
Keeping your video footage steady is crucial for a professional look. The EOS R50 offers several image stabilization options:
- Lens-Based IS (Optical IS): If you are using a lens with built-in image stabilization (indicated by “IS” in the lens name), this is the most effective form of stabilization. Turn on IS on your lens.
- Digital IS (Movie Digital IS): The R50 offers digital image stabilization, which crops into the image slightly and uses software to stabilize footage. It can be helpful, especially with lenses that don’t have IS, but it can reduce image quality slightly and introduce some digital artifacts, especially at higher stabilization levels.
- You can choose “Enhanced,” “Standard,” or “Off” for Movie Digital IS in the menu. “Standard” is a good compromise. “Enhanced” provides more stabilization but crops more and can introduce more artifacts.
- Combined IS: Lens IS and Digital IS can work together for even more stabilization in some situations.
- Tripods and Gimbals: For the absolute steadiest footage, especially for static shots or smooth camera movements, use a tripod or a gimbal.
6. Exploring Creative Video Modes
The EOS R50 offers some creative video modes to expand your filmmaking possibilities:
Related articles 02:
1. https://cacutproapk.com/capcut-vs-premiere-pro-a-david-and-goliath-showdown-in-video-editing
4. https://cacutproapk.com/capcut-your-pocket-sized-travel-video-editing-studio
5. https://cacutproapk.com/capcut-vs-kinemaster-which-video-editor-reigns-supreme-in-2024
- Slow Motion Recording (High Frame Rate Movie): Record in Full HD at 120fps for smooth slow motion footage. You can slow down this footage in editing software or directly in-camera during playback.
- Time-Lapse Movie: Capture long periods of time condensed into a short video. You can set the interval (how often a photo is taken) and the number of shots in the Time-Lapse movie mode in the menu.
7. Composition and Storytelling Basics for Video
While technical settings are important, good composition and storytelling are what make your videos engaging. Here are a few key principles:
- Rule of Thirds: Imagine your frame divided into a 3×3 grid. Placing key subjects or points of interest along these lines or at their intersections creates more visually appealing compositions.
- Leading Lines: Use lines (roads, fences, rivers, etc.) to guide the viewer’s eye into the scene and towards your subject.
- Headroom and Nose Room: When filming people, leave appropriate space above their head (headroom) and in the direction they are looking (nose room).
- Shot Types: Vary your shots to keep viewers engaged.
- Wide Shot: Establishes the scene, shows the environment.
- Medium Shot: Shows the subject and some of the surroundings.
- Close-Up Shot: Focuses on details, emotions, or specific objects.
- Camera Movement: Use camera movement purposefully to add dynamism.
- Pan: Horizontal camera movement.
- Tilt: Vertical camera movement.
- Smooth Movement: Practice smooth pans, tilts, and walking shots. Avoid jerky or shaky camera work.
- Tell a Story: Think about the narrative you want to convey in your video. Even short videos should have a beginning, middle, and end, and some kind of message or point of interest.
8. Post-Production Basics
Shooting is only half the battle. Video editing is where you refine your footage, add music, sound effects, text, and create the final polished product.
- Video Editing Software: You’ll need video editing software to edit your R50 footage. Options range from free mobile apps (like CapCut, InShot) to more powerful desktop software (like Adobe Premiere Pro, Final Cut Pro, DaVinci Resolve). DaVinci Resolve offers a powerful free version that is excellent for beginners and professionals alike.
- Basic Editing Steps:
- Import Footage: Import your video clips into your editing software.
- Organize and Trim: Organize your clips and trim out unnecessary parts.
- Sequence Clips: Arrange your clips in the desired order to tell your story.
- Add Transitions: Use transitions sparingly to smoothly connect clips. Simple cuts are often the most effective for vlogs and online content.
- Color Correction and Grading: Adjust the colors and tones of your footage to enhance the visual look.
- Audio Mixing: Adjust audio levels, add background music, sound effects, and ensure your voice or main audio is clear and audible.
- Add Text and Graphics: Add titles, lower thirds, and graphics to provide information or visual interest.
- Export: Export your finished video in a suitable format (MP4 is widely compatible) and resolution.
Conclusion: Unleash Your Video Creativity with the EOS R50
The Canon EOS R50 is a surprisingly capable video camera in a compact body. By understanding its video settings, mastering autofocus and exposure, utilizing image stabilization, and practicing composition and storytelling, you can create impressive videos that capture your vision. Don’t be afraid to experiment, practice, and learn as you go. The best way to improve your video skills is to keep shooting and editing! Enjoy your video journey with the Canon EOS R50!
